Custom 3D USB Drives: Turning a Logo or Mascot Into a Drive Buyers Keep
You already have the mascot, the anniversary mark or the product silhouette. What you want is a working USB drive that looks like it, and a supplier who will not cut steel until you have approved the shape. The buyer-side workflow is short and worth knowing: send a sketch, photo or vector logo; review a 3D CAD proof; hold a physical sample in your hand; then commit to tooling. Each step has a gate where you can still change direction cheaply. This article walks those gates, and separates the custom-shape route from printing a logo on a standard shell, so you can tell which one your brief actually needs.
What to Send: Sketch, Photo or Logo File
Start with the artwork you already own, not with a description. A vector file (AI, EPS or SVG) is the cleanest input because the outline stays sharp at any size; a high-resolution photo works for a sculpted object such as a bottle or a character, lit evenly against a plain background. A rough hand sketch is enough for the first conversation, but expect the supplier to redraw it before any proof is made.
Three decisions should be settled in this first exchange. First, orientation and relief: a raised shape on the face, an engraving inside clear acrylic, or a flat printed area? Internal laser engraving in a crystal body gives a floating three-dimensional image that cannot be scratched off, but it needs a simple, bold outline to read clearly. Second, scale: a mascot with fine facial lines loses detail below a few centimetres, so ask for the minimum size at which each line still separates. Third, the body itself. A shape that follows the logo needs a new tool; a standard rectangle with the same logo printed on it does not. Ask for both quotes before you choose one route.
Give the supplier the intended capacity and interface at this stage too. Common builds span 8 GB to 64 GB and USB 2.0 or 3.0, and the memory chip choice affects the internals and the unit price. A brief that fixes these early avoids a redesign after the sample.
The 3D Proof Step Before Tooling Is Committed
A 3D CAD proof is the supplier's rendering of your idea from several angles. It is not a photograph of the final product; it is the cheapest moment to fix proportions. Read it like a QA engineer. Check the silhouette from the side and underneath, not only the front view. Look for undercuts — any part that hooks back on itself — because those need sliding parts in the tool and are a common source of extra charge. Check how the keychain loop is anchored; a loop that is only glued on will fail long before the drive does.
Then insist on a physical sample before the steel is cut. A resin sample lets you judge weight, edge comfort and how the logo catches light, none of which a screen can show. Clip it to a keyring and put it next to the object it is meant to resemble. If a detail matters — the tilt of an ear, the exact brand colour — say so while the sample can still be revised at low cost. Once the tool is machined, the same change means rework and a second charge.
Ask the supplier to label the sample with the artwork revision number. Samples from two rounds look similar, and a signed approval pointing to the wrong version is a dispute waiting to happen. Use one file name, one revision number, one approved sample, photographed and dated.
Mold Fee, MOQ and Lead Time on One Quote
A custom shape carries a one-off tooling charge because a steel body has to be machined for your design alone. The fee moves with the size of the part, the number of cavities, whether slides are needed for undercuts, and the surface finish. More cavities lower the unit price but raise the tool cost up front, which is why the fee and the unit price must be read together. Ask the supplier to show both columns at two or three cavity counts.

The minimum order quantity is usually tied to the shape, not to the whole catalogue: your custom body has its own MOQ because the tool must be run economically. Any printing or engraving step on a standard body may have a separate, lower run minimum. Ask for each minimum on its own line so you know which one is actually constraining the order.
For timing, ask for the stages rather than a single date: proof, sample, tool cutting, first article inspection, then mass production. Get each stage written into the quote. A supplier who explains the sequence is easier to hold to than one who gives only a promise. Treat any number here as a planning figure to confirm in writing, not a launch-date commitment.
When a Custom Shape Beats a Standard Body
Choose the custom route when the shape itself is the message: a recognised mascot, a product silhouette, or an anniversary form kept on a keyring for years. The higher unit cost is justified when the drive is a keepsake the recipient keeps for its looks. For a trade-show handout where the message changes every event, the same money usually buys more printed standard bodies.
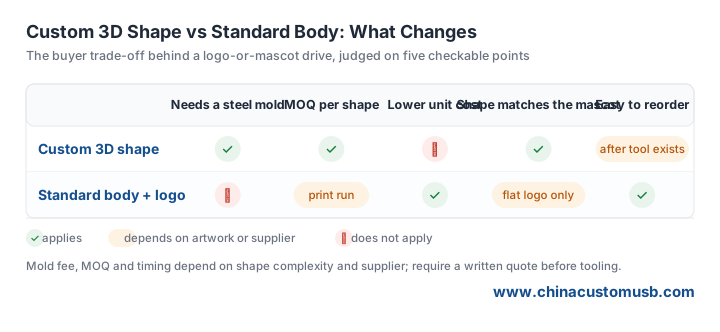
Reordering is the other half. A steel tool stays with the supplier, so a repeat order on the same shape normally avoids a second tooling fee; changing supplier means a new tool. If the programme may move vendors, ask now who owns the tool and whether it transfers. A printed standard body has none of this lock-in.
A Checklist Before You Approve the Sample
Approve only when five things are true: the artwork revision matches the file you sent; the shape reads from the side and at arm's length; the cap and keyring feel secure; the capacity and interface match the quote; and the mold fee, MOQ and stage timing are on the same sheet. Photograph the approved sample and keep the dated approval with the purchase order.
Then ask for a first-article sample from the actual production tool and memory chip before the full batch ships. It is the step buyers skip most often, and it tells you whether production matches the hand-made sample before hundreds of units are finished. A small delay with a large payoff.
Ready to turn your mascot or logo into a drive people keep? Send your artwork and target capacity for a shape-versus-standard quote, including the 3D proof, physical sample, mold fee and MOQ on one page, and request a free sample and quote to see the options for your programme.
Need custom USB drives for your next project?
Factory-direct pricing, free digital proof and a 7-day sample turnaround.
Get a free quote

